Friday 20 April 2012

I'm ready for my close up: The Pea Shoot

I first cottoned on to these delicious greens 5 years ago when my best friend Mynhardt ran out to his garden and returned with a hand full of the most gorgeous looking green sprouty thingys I now know as pea shoots.  He used them as garnish on our steak and chips, with a drizzle of balsamic reduction and a sprinkle of pine kernels. I was dumbfounded, you can imagine, just picked organically grown and wonderful. Not only were they very handsome on my plate, but they were also utterly delectable with a sweet crisp slightly peppery flavor, starting a love affair of taste every winter since. 
Okay I've seen micro greens sold in supermarkets and they are wonderful if some what pricey, but I have never seen pea shoots offered on a general scale to the public. I'm sure you'll find them at fine food markets and specialty stores, but here is the good news, you can grow them very easily, inexpensively and quickly yourself. The best thing about them is that they are winter crops in South Africa, making them an ideal substitute for spring and summer greens. If your smart about it you'll manage a seasonal cross over combination with beat shoots spinach and leek flowers - and now were talking full on flavor!

How to grow pea shoots
Growing pea shoots is so easy and perfect if you're short on space. They grow in pretty much anything - I'm using old yogurt pots and those dishes that mushrooms often come in - just punch some holes in the bottom for drainage. Peas are sowed in winter and normal garden pea plants take months to grow and require more space and effort, but you can plant peas for shoots densely in individual containers or planters and if mother nature willing you'll be able to harvest your first shoots within 2-3 weeks! They like full sun and needless to say you should keep them well watered - that means every day peeps, at least until your plants are a bit more established.

You could go buy pea seeds from your local nursery, or you could pop into the super market and get a bag of whole dried green peas and go crazy with them :)
Grab a container of choice and add some potting soil. Don't use compost in a pot it creates a layer of gas that will impede your plans growth. You're only after the shoots here so you don't need it to be very deep - a few inch will do. Now scatter over some dried peas, I add a small amount of slow release fertilizer obtainable from any garden store or nursery. Lightly cover the seeds with some more potting mixture. Water them gently but well.
Leave them in a sunny spot, they like full sun but keep an eye out in the first 2 weeks, if they get hot and wilted move them into some shade.   
They taste best when they're young and crisp - the flavour is delicate and fresh and faintly pea-some. After that the leaves start going a little flimsy.
Uses for pea shoots: Salads (especially when feta is involved!), stir-fries; garnishes for soups. Maybe stick them in those green smoothies. I like just munching a handful of shoots by themselves.


Saturday 14 April 2012

Gnocchi Pockets with Courgette and Feta filling

Dinner for two? These gnocchi pockets are simple, fast and utterly delicious! The perfect starter that will impress while still have the diner hungering for more.

The filling:
Now you could fill these guys with what ever you fancy most: cheese, mushroom, spinach, kale and even egg yoke.  What ever you like make sure its a delicate neutral combination as this dish is all about flavors coming together in your mouth.

I use courgette and danish feta, seasoned with gremolata - parsley, olive oil, lemon zest and juice and a bit of garlic. Grate 3 - 4 medium sized courgettes into a bowl, break up the feta (about one table spoon for each courgette) and dress with the gremolata - nothing to it

The Pockets:
If your a puritan you could make the proper gnocchi dough - see our March blog post "Cumin Pear Gnocchi with Ver Belegen Sauce"and use that to make the pockets, but here is a fast food version especially helpful if your low on time.

Rinse 3 medium sized brown potatoes, pop them in a plastic bag, sprinkle with some salt and nuke them for 12 min on high in the microwave.  Skin the potatoes and mash them in a mixing bowl.  Add 1 egg and 2 or 3 handfuls of cake flour.  Add a dash of nutmeg and ground pepper.  Use your hands to mix and keep adding flour till u have a ball of workable dough. 
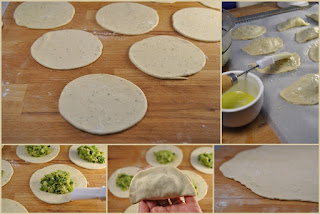
While using flour break off balls of dough and flatten them into rounds in the palm of your hands.  About 10 cm in diameter.  


You can role out the dough in perfect little rounds, or you can take a short-cut: place a teaspoon or so of the filling in the center of the round and fold the edges together.  Simply press between your thumb and fore-finger sealing the pocket.  Lay to rest on a well floured surface.


The Cooking:
Get your biggest pot with water to a rapid boil. Add salt. Carefully dump the pockets in one at a time. Use a slotted spoon or basket to make sure they don't get stuck to one another.  They are cooked as soon as the pockets starts drifting to the surface. 

The Plating:
Strain and transfer to your plate. I like mine with sage butter: it is as simple as melting butter with fresh sage leaves and holding it at a low temp for a few minutes. You might want to bruise the sage leaves before adding them. Good olive oil is just as yummy though. Finish with the best parmasan cheese you can find, season and enjoy immediately!

Tip: use a splash of that gremolata you made as an added burst of color and flavor. 


Wednesday 4 April 2012

Rack of Lamb with Mint and Capers

Garlic and lemon invigorate the familiar pairing of succulent roasted rack of lamb and mint in an intense marinade that infuses the meat overnight. The fresh herb then makes an encore in a sauce with capers that's slathered generously on the lamb and served on the side.


Ingredients

FOR SERVING
Lemon wedges, for garnish
Fresh mint sprigs, for garnish
FOR THE CAPER-MINT SAUCE
1/2 cup salt-packed capers, rinsed well
2 cups fresh mint
2 teaspoons finely grated lemon zest
1/4 cup fresh lemon juice (from 2 lemons)
1/4 cup minced shallots (from 2 shallots)
1/2 cup extra-virgin olive oil
FOR THE LAMB
4 garlic cloves, crushed
1/2 cup fresh mint, roughly chopped
2 teaspoons finely grated lemon zest
1/4 cup fresh lemon juice (from 2 lemons)
1/2 cup extra-virgin olive oil
Coarse salt and freshly ground pepper
2 racks of lamb (about 3 pounds), frenched
2 tablespoons safflower oil

Directions
Make the lamb: Whisk together garlic, mint, lemon zest and juice, olive oil, 2 teaspoons salt, and 1/2 teaspoon pepper in a medium bowl. Place lamb in a large resealable plastic bag; add marinade and refrigerate overnight.
Let lamb stand at room temperature for 1 hour. Preheat oven to 200 degrees celsius. Remove lamb from marinade, brush off any garlic and mint, and pat dry with paper towels. Discard marinade. Season lamb with salt and pepper.
Heat safflower oil in a large ovenproof skillet over medium-high heat. Add lamb; cook, flipping once, until browned, 2 to 3 minutes per side. Transfer skillet to oven; cook 20 to 25 minutes for medium-rare.
Meanwhile, make the caper-mint sauce: Pulse capers in a food processor until roughly chopped. Add mint, lemon zest and juice, and shallots, and pulse until mint is roughly chopped. Add olive oil in a slow, steady stream, pulsing until combined but still coarse. Transfer to a small bowl.
Transfer lamb to platter and coat racks with a third of the caper-mint sauce. Let rest for 20 minutes. Cut lamb into chops, single or double thickness; transfer to a serving platter. Garnish with lemon wedges and mint sprigs; serve with remaining sauce.